So, finally it seems like, after crossing the deadline by a couple months, Magnetic Lasso is going to get merged, as Boud told me. Lets see how many more weeks it takes, so presumably it is complete feature wise but who knows from where a bug might pop up. This post is mainly for documenting how the Magnetic Lasso works, since I am too good to make an entry in the manual.
Update: It got merged in master, could be tried by downloading one of the nightlies, 😃.
Initially, I started writing the tool as almost one to one copy of the Photoshop one, but as it has always been, Krita is not Photoshop. A small quirk in the code-base, unknown to me, threw me off the deadline, though to be honest, I was never going to make it by the estimated deadline, given how I miscalculated the effort required for doing the job. Oh, btw do you know Adobe is deactivating all the user accounts in Venezuela to comply with an executive order? It is high time to switch to free software, 😄.
Anyway, the first thing to note is, it no longer works like the PS one, and what I mean by it is, fundamentally both do the same thing, but the User Experience or the UX is different. In Photoshop,
- We click on a image and make an anchor. Beware I use point/anchor in the post interchangeably, don’t worry both mean the same thing.
- Then hover around the edge present in the image and the selection sticks to the edge.
- We keep on selecting, until we complete the selection by clicking on the initial point which we made in the Step 1.
In Krita,
- You make a point by clicking on the image, similar to Photoshop.
- Then go on making points like the polygon selection tool, and the path automatically sticks to the edges present in the image.
- We can either click on the initial point to close the loop and press
Enteror simply pressEnterto make a selection, we will call this the manual mode, just for clarity.
Or,
- You press on a part on the image.
- Then drag the mouse while keeping your left mouse button pressed, along the edge.
- Release the mouse when done, the path would automatically stick to the edges present in the image
- Now we can either click on the initial point to close the loop and press
Enteror simply pressEnterto make a selection and we will call this approach the interactive mode.
Now the craziest part is both of the approaches can be used interchangeably, in whatever way we want. Both will result similar kind of selections depending on how you place the points in the first approach, since the points are placed automatically by the algorithm in the second approach.
Note: We can also create a selection after closing the cage by clicking on the initial point one more time.
But what is the reason of creating anchors? There is not only one reason but a bunch of them, well in short cause they are editable,
- To delete an anchor you can either double click on the anchor or click drag it out of the canvas.
- The path can be adjusted by selecting and dragging the anchors.
- We can also add new anchors in middle by double clicking in the empty space but this is only available after completing the cage by clicking on the initial point.
- We can undo the points by pressing
Shift+Zthis would delete the last anchor that we made.
And to cancel a selection just press Esc, it would remove everything and start from scratch. Rest of the functions are similar to the other selection tools like the Outline Selection Tool, so we can just refer to the manual for the rest like adding to the selection and deleting from the selection.
Now, since UX is out of the way, Magnetic Lasso, gives us 4 options to play with in the Tool Options docker, as seen in the Screenshot,
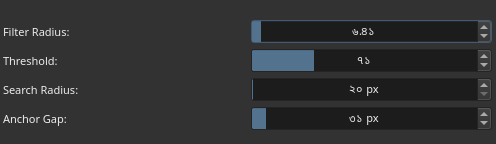
- Filter Radius: Determine the radius of the kernel to be used for the pre-filtering the image for the initial guess where the edges are. The range of which is from 2.5 to 100.
- Threshold: From 0 to 255, how sharp your egde is, 0 is least while 255 is the most, used in the Interactive mode only.
- Search Radius: Amount of pixels the search area for the edge is extended to, beware more the amount of pixels, more slow the algorithm will get, since it has to search bigger areas now.
- Anchor Gap: As, in interactive mode anchors get placed automatically, this value determines the average gap between 2 anchors, keep low for high precision, but can get quite dense in low values.
Writing documentation is hard, thats all for now, :wq till next week.